


1. Introduction
Apache Spark on Kubernetes is generally available since release 3.1.0 and is quickly gaining popularity as an alternative to YARN clusters, enabling efficient resource sharing, multi cloud deployments and access to a rich open-source ecosystem of tools ranging from monitoring and management to end-to-end data and machine learning pipelines. On Amazon EMR on EKS, Spark jobs can be deployed on Kubernetes clusters, sharing compute resources across applications with a single set of Kubernetes tools centralizing monitoring and management of infrastructure.
Unfortunately, it is not straightforward to deploy Spark workloads to a Kubernetes cluster that is mostly comprised of Graviton-based instance types: The Spark operator does not seem to be compatible with architectures other than x86 and we encountered problems when using the manifests from official AWS guides. This article walks through an end-to-end example of running a demo application on an EKS cluster with Graviton or x86-based instances and on an EMR virtual cluster: The next section describes how customized Docker images with open-source and EMR runtimes can be created and published to ECR. Sample configuration steps for provisioning an EKS cluster and running an oss Spark job on it are covered in section 3. In the last part of this post, EMR on EKS is enabled and a job run on a virtual cluster is scheduled.
2. Customizing Docker Images
Kubernetes is a container orchestrator so applications need to be containerized before they can be submitted to an EKS cluster. On AWS, container images are distributed with the Elastic Container Registry service. The following subsections show how to build and publish custom Docker images with a Spark distribution and an EMR runtime. In the second half of this article, these images are deployed to an EKS cluster.
2.1 Prerequisites
Container images are stored in repositories of a registry. For the two custom Docker images that will be used later, two private ECR repositories with the names spark_3.1.2_tpch and emr_6.5_tpch should be created:

We build the images on EC2. The choice of the instance type depends on the processor architecture of the EKS cluster nodes that will host Spark pods: When ARM-based nodes will be provisioned, the m6g.xlarge instance type is more than sufficient for creating the custom images. For nodes with x86 architecture CPUs, an m5.xlarge instance should be launched. Amazon Linux 2 needs to be selected as the machine image and the root volume size should be set to around 20 GiB. When the instance is up and running, we log onto it and install a few dependencies:
It is advisable to set a few environment variables, this shortens subsequent commands for pushing and pulling images:
The format of a repository URL is determined by its visibility:
- URLs for private ECR repositories follow the format account-id.dkr.ecr.region.amazonaws.com
- Public repo URLs start with public.ecr.aws/ followed by an alias
A variable that stores a private repo URL is defined as follows:
2.2 Building a Custom OSS Spark Image
The Apache Spark codebase already contains a Dockerfile that is suitable for creating a base image with a binary distribution from which more specialized images can be derived. As first step, the Spark source code needs to be downloaded and extracted:
The AWS EKS guide suggests to build Spark 3.1.2 with a member of the Hadoop 3.3 release line so improvements for Kubernetes and S3 can take effect. One entry of the root POM file has to be modified for this purpose:
A runnable Spark distribution is then composed with the help of the make-distribution script:
Now the base image can be created:
Since the sample program that is executed later on needs to access the TPC-H kit, a layer with this library should be added to the base image. Our Dockerfile contains all the instructions required for assembling a TPC-H image:
The TPC-H image is derived as follows:
Before the new image can be pushed to the spark_3.1.2_tpch repository, Docker must be authenticated to the registry:
After the authentication succeeds, the image is published:
2.3 Building a custom EMR Image
The spark_3.1.2_tpch image is not compatible with EMR on EKS as it encapsulates open source Spark binaries. Therefore, a similar package that embeds an EMR runtime needs to be created before the demo application can be used in a job run. EMR images are publicly available, the different ECR registry accounts are listed on this page. For the us-east-1 region, the corresponding repository URL is 755674844232.dkr.ecr.us-east-1.amazonaws.com:
An authentication step is required before accessing any official AWS image:
The EMR equivalent to the spark_3.1.2_tpch image can now be assembled. Because a 3.1.2 distribution was compiled in the previous section, a base image with an emr-6.5.0 tag should be downloaded since the same Spark version is supported by this EMR release:
The Dockerfile that adds the TPC-H kit to the container filesystem is reused, but this time an EMR URI is passed as its base image argument:
Finally, the derived EMR-TPCH image is uploaded to a dedicated ECR repository:
After the images have been published, the EC2 instance that executed the build instructions is no longer needed and should be terminated.
3. Creating an EKS Cluster
The following paragraphs explain how a Kubernetes cluster can be deployed with EKS. In section 4, a Spark application is submitted to this cluster and in the last part of this article, EMR is registered with it and a job run is initiated.
3.1 Prerequisites
EKS clusters can be launched from local development environments but the command-line tools <span class="monospace">kubectl</span> and <span class="monospace">eksctl</span> need to be installed, more information is provided on this page. The architecture and basic concepts of Kubernetes are described here.
3.2 Cluster Configuration
Our eks-cluster-arm.yaml and eks-cluster-x86.yaml manifests contain the configuration details for a basic EKS cluster.
eks-cluster-arm.yaml
If the application images support ARM architectures, the file with the matching arm infix needs to be downloaded as it specifies worker nodes with this CPU architecture:
The manifest eks-cluster-x86.yaml should be used for the alternative x86 architecture option:
A dedicated VPC will be created for the cluster, so only a few lines that reference availability zones and are marked with ToDo comments may have to be modified. The test cluster can be spawned with the <span class="monospace">eksctl</span> command-line tool:
As part of the cluster creation process that is started by the last command, several infrastructure resources are provisioned and configured via CloudFormation. These operations tend to be time consuming and can take more than half an hour to complete.
If the cluster launch is successful, the final log message will contain the following statement:
In case errors appear on the terminal, it might be necessary to manually delete cluster-related stacks in the CloudFormation console and re-execute the <span class="monospace">eksctl</span> command.
Eventually, an EKS cluster that consists of four EC2 instances will be up and running. The local kubeconfig file should have been updated with an entry for eks-test-cluster, in which case the <span class="monospace">kubectl</span>/<span class="monospace">eksctl</span> CLIs point to the new cluster. If the commands used below return nothing or information of a different cluster, the kubeconfig documentation should be consulted.
The four instances listed in the terminal output above are grouped into three node pools:
The control plane and other processes that provide core K8s functionality run on a low cost t3.large instance in the tooling nodegroup. The Spark driver pod will be hosted on a dedicated m6gd.large (or m5d.large for x86) instance. Executor pods can be assigned to two m6gd.2xlarge (or m5d.2xlarge) workers which comprise the exec-group nodegroup. No Spark pods have been launched yet but this will change during the next two sections:
The sample program that will run on the cluster was introduced in our previous post, it consists of 22 benchmark queries. Therefore, node reclaiming events and up/downscaling will be avoided — all four cluster nodes are provisioned as on-demand instances and, later on, neither dynamic allocation nor autoscaling will be activated. For workloads with less stringent requirements, the use of dynamic scaling and a few spot instances that can host Spark executors tends to be much more cost-effective.
3.3 Mounting NVME Disks
Both the m6gd and m5d families support instance store volumes, namely local NVMe SSDs. These devices are very good storage backends for the temporary files that Spark creates due to their high I/O performance. In our previous benchmarks, we have seen significant run time differences between different AWS storage options for shuffle-intensive queries like TPC-H Q18. NVMe-based SSDs are not automatically set up during an EKS cluster launch which is an important difference to EMR on Ec2 . For this reason, our cluster manifests contain preBootstrapCommands sections that perform the formatting and disk mounts. After the bootstrapping phase of an EKS cluster has completed, the disk setup can be checked by connecting to one of the nodes with an instance store volume. This requires two changes in the exec-group section of the cluster definition file:
- The value for the privateNetworking field should be set to false so the associated instances receive a public IPv4 DNS.
- An ssh entry similar to the following one should be inserted:
After adding an ssh inbound rule to the security group of the target node, we can ssh into it and confirm the volume mounts:
According to the terminal output, two devices are attached to the instance: The root EBS volume nvme0n1 of size 15 G has two partitions whose mount points are / and /boot/efi. The instance store volume nvme1n1 is mounted at the directory /local. In sections 4 and 5, Spark applications get configured to write shuffle files to a directory under /local so the fast NVMe SSDs are used for the scratch space.
3.4 Access Management
If the demo application was submitted to the Kubernetes cluster at this point, failures would occur as pods have not been granted permissions yet to perform actions on external resources like S3. To avoid this, an IAM policy with these S3 and logging permissions will be defined.
eks-test-policy.json
A few environment variables should be declared since subsequent commands make multiple references to account details that change from user to user: S3_TEST_BUCKET holds the name of the S3 bucket under which the application input and results are stored, the account id is retrieved with a command and assigned to the variable ACCOUNT_ID:
An IAM policy named eks-test-policy can now be defined easily:
Pods do not directly use an IAM policy, the association happens through a Kubernetes service account which is created as follows:
This single <span class="monospace">eksctl</span> command accomplishes multiple tasks:
- A namespace oss is created.
- An IAM role and service account pair is created.
- The IAM role is mapped to the service account oss/oss-sa.
- The policy eks-test-policy is attached to the newly created role.
In section 4.1, the job manifest configures the Spark pods to use the oss/oss-sa service account so they can enjoy the permissions declared in eks-test-policy. The policy has to be created only once but the <span class="monospace>"create iamserviceaccount</span> command needs to be repeated whenever a new EKS cluster is provisioned.
3.5 The Kubernetes Dashboard
A useful tool in the Kubernetes ecosystem is the Dashboard, a web-based UI that visualizes a cluster and its K8s objects. Unfortunately, it is not pre-installed on EKS clusters, so a number of steps are required before it can be accessed. The Dashboard can be deployed as follows:
Accessing the UI is much more involved than installing it, the most straightforward authentication strategy consists in using a bearer token: First, the kubectl proxy is started:
Copy-pasting the below URL into a browser window opens the Dashboard login view, the port number (8001 here) may have to be adjusted depending on the proxy output:
To pass through the login page, an authentication token needs to be retrieved from a new terminal window:
After pasting the returned string into the Enter Token field of the login page, the UI should appear:
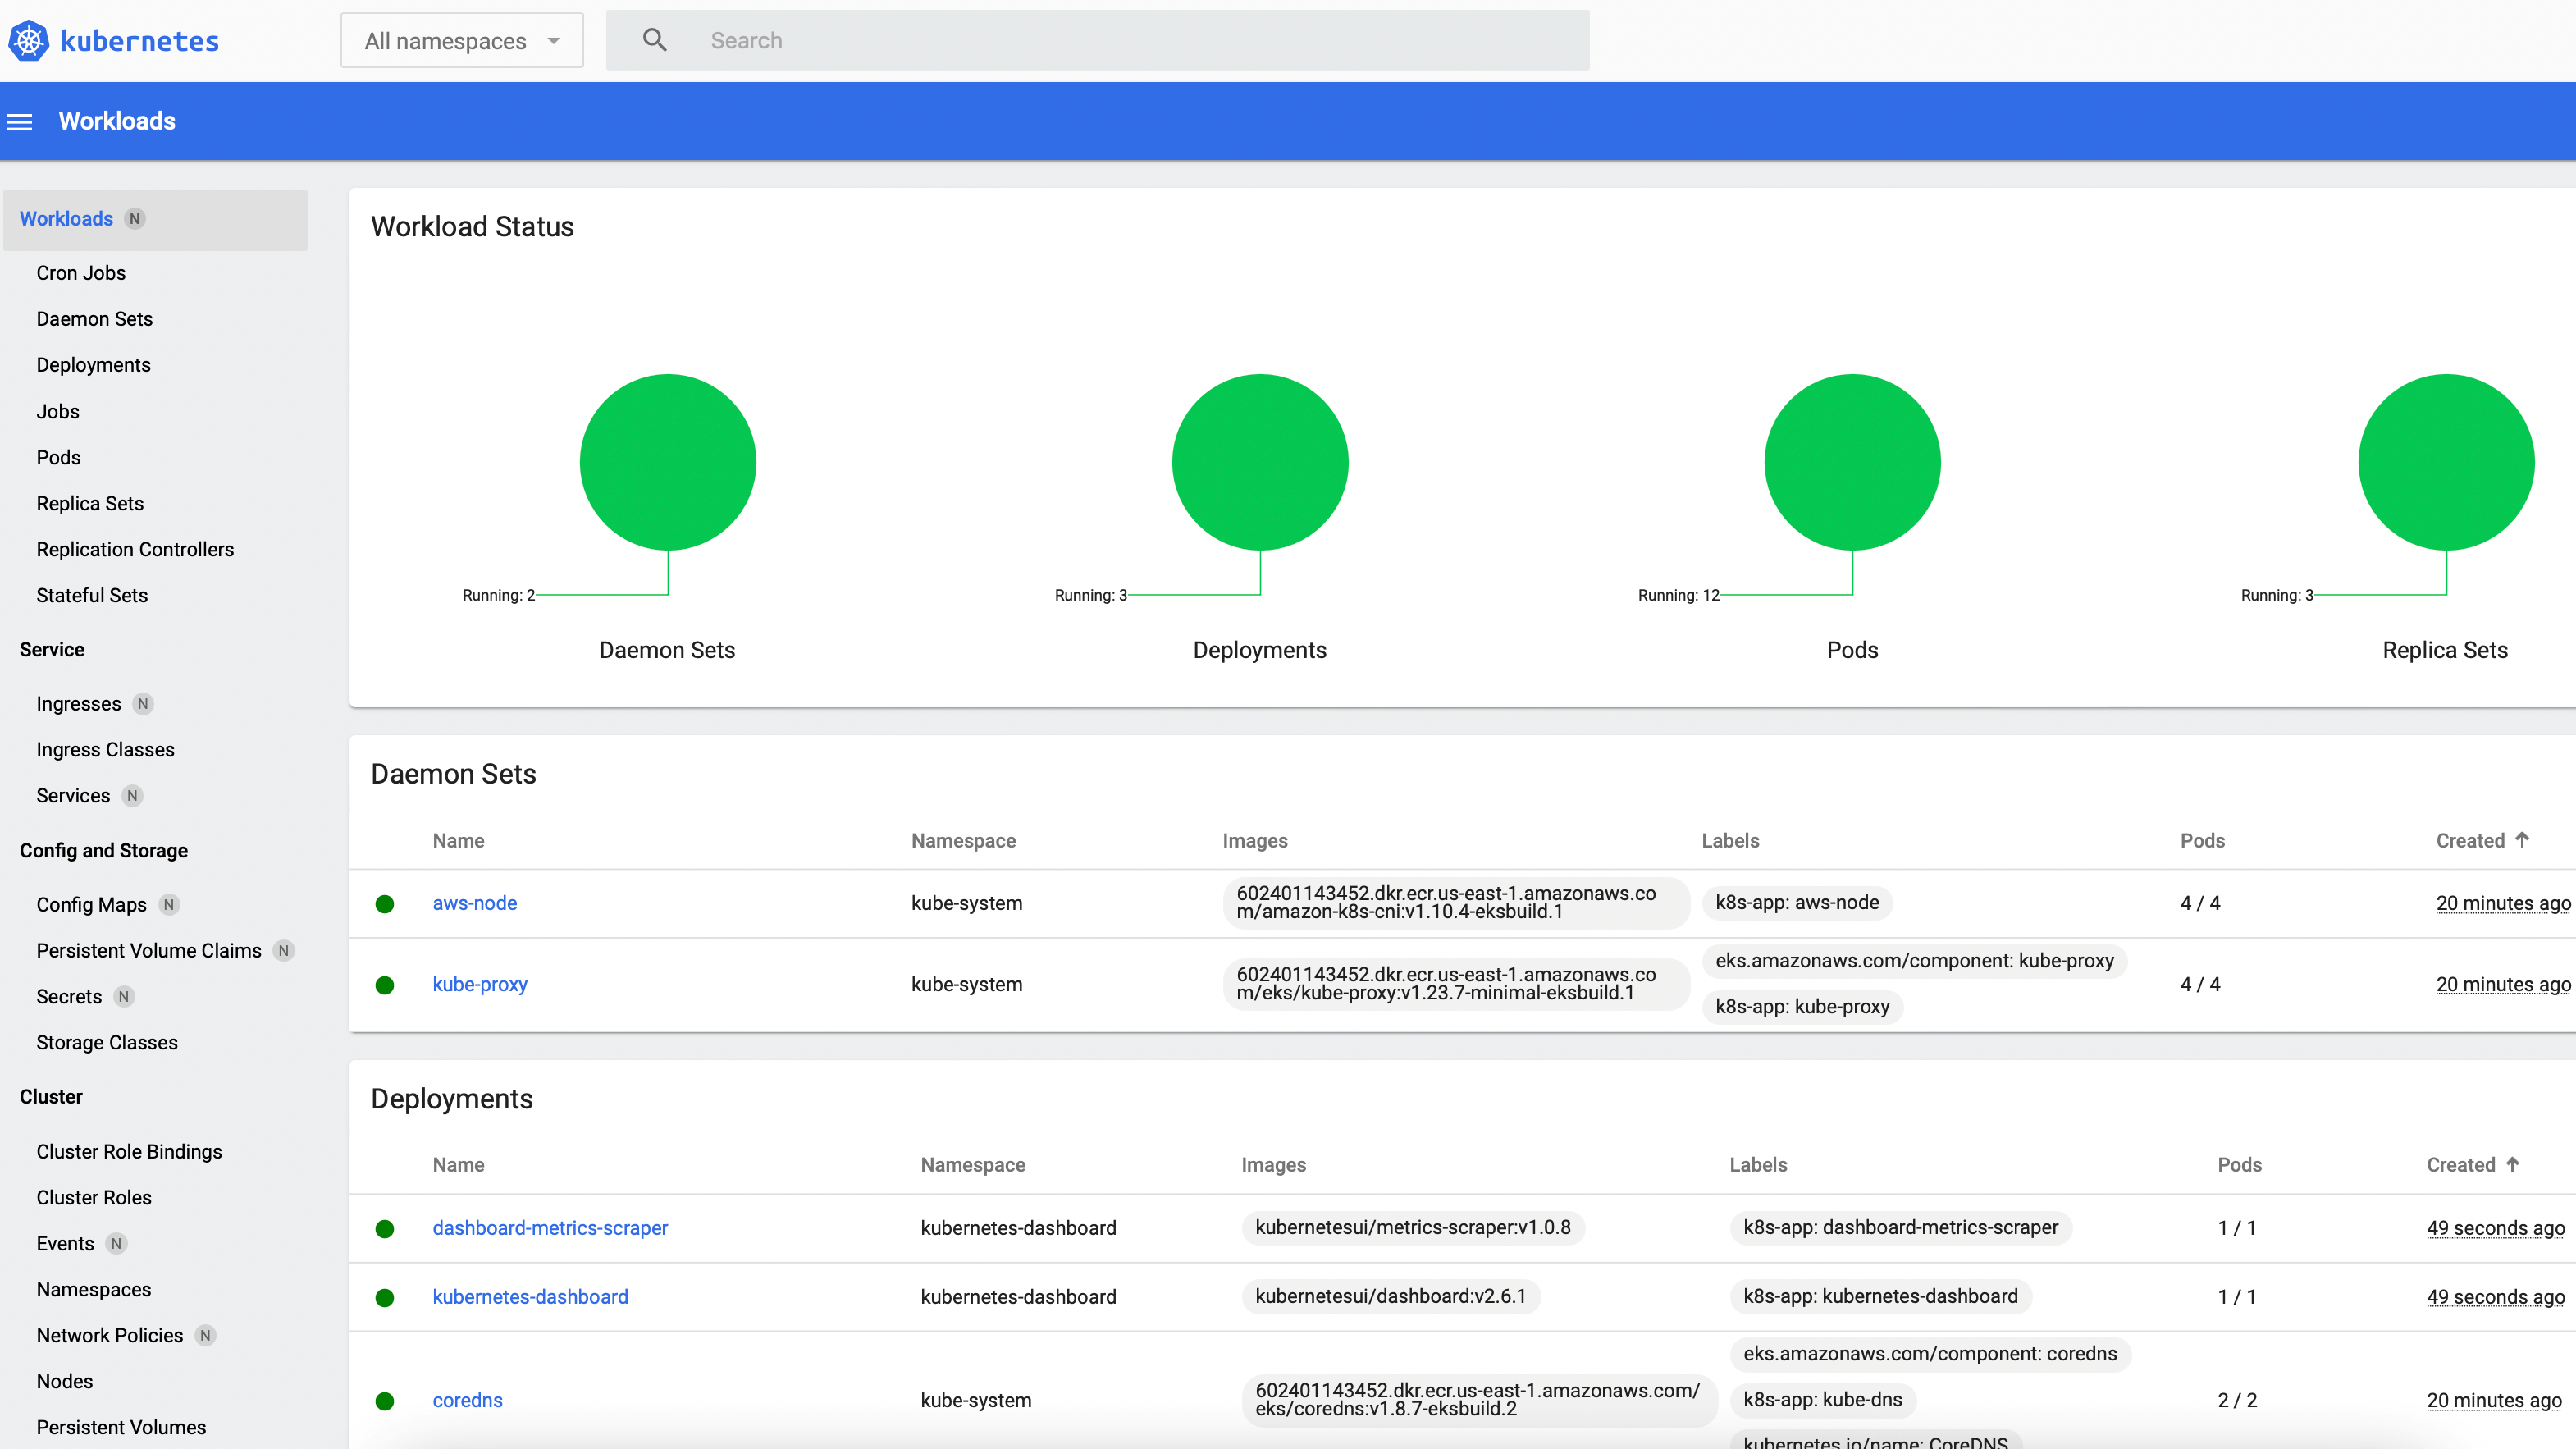
No applications have been submitted yet but the UI is still populated: After the All namespaces option is selected from the drop-down menu near the top-left corner, the Workloads tab displays a few active Kubernetes objects that provide core cluster and Dashboard functionality. When the first benchmark workload is deployed in the next section, a new Jobs entry along with multiple Spark pods will be displayed:
4. Using OSS SPARK on EKS
After following the instructions from the last section, an EKS cluster that is configured to access AWS resources will be running. The custom oss Spark image that was created at the beginning of this article can now be used in the first workload.
4.1 The Kubernetes Job Configuration
For our previous benchmark article, we executed TPC-H queries via spark-submit on EC2 and on EMR. The same program can be run on an EKS cluster by integrating it with a Kubernetes Job. Our oss-job.yaml manifest follows this approach, it instantiates a container from the spark_3.1.2_tpch image and invokes spark-submit in it. The most important segments of this job configuration are described in more detail below.
oss-job.yaml
The main program that gets called by spark-submit in line 66 is RunMainTPC.scala. It is packaged into the JAR cloudbench-assembly-1.0.jar, the steps required for creating this file are described on our Github repository. <span class="monospace">RunMainTPC</span> expects five arguments which are specified right after the JAR file on lines 91 to 95 of the Job definition.
Not all relevant pod settings can be directly defined with custom flags in the spark-submit command. Therefore, the manifest uses the pod template mechanism for accomplishing two important configuration tasks:
- Node selectors are declared which constrain the set of worker nodes to which driver and executor pods can be assigned. For example, the driver pod can only be scheduled on a m6gd.large instance (or m5d.large for x86) as no other cluster node was tagged with the label noderole: driver .
- Sidecar containers are added, they configure the volume access so Spark can write scratch data under the mount point directory of the fast NVMe volume.
The template content is stored as key-value pairs in the data field of the ConfigMap eks-configmap in line 19. This map gets mounted as a volume into the job container: The volumes section of the Job spec (line 106) references eks-configmap and copies its contents into the driver and executor template files whose paths are specified in the volumeMounts field. Spark pods can then read the configuration data from the file mounts.
It is important that the NVMe devices that are attached to the m6gd.2xlarge (or m5d.2xlarge) instances are used for the Spark scratch space. This can be validated by connecting to a node that hosts executors (see 3.3) and checking its disk space while a query with a larger shuffle is executed:
In oss-job.yaml, the application property spark.local.dir is set to /local/scratch in line 86 so temporary data (e.g., shuffle files) are written to this directory. According to the terminal output, the mount point directory /local is associated with the NMVe volume which held around 19G of Spark scratch data when the df command was entered. This number is higher than the total root volume size and confirms the correctness of the disk setup.
4.2 Running the Kubernetes Job
The batch job described in oss-job.yaml can be deployed as follows:
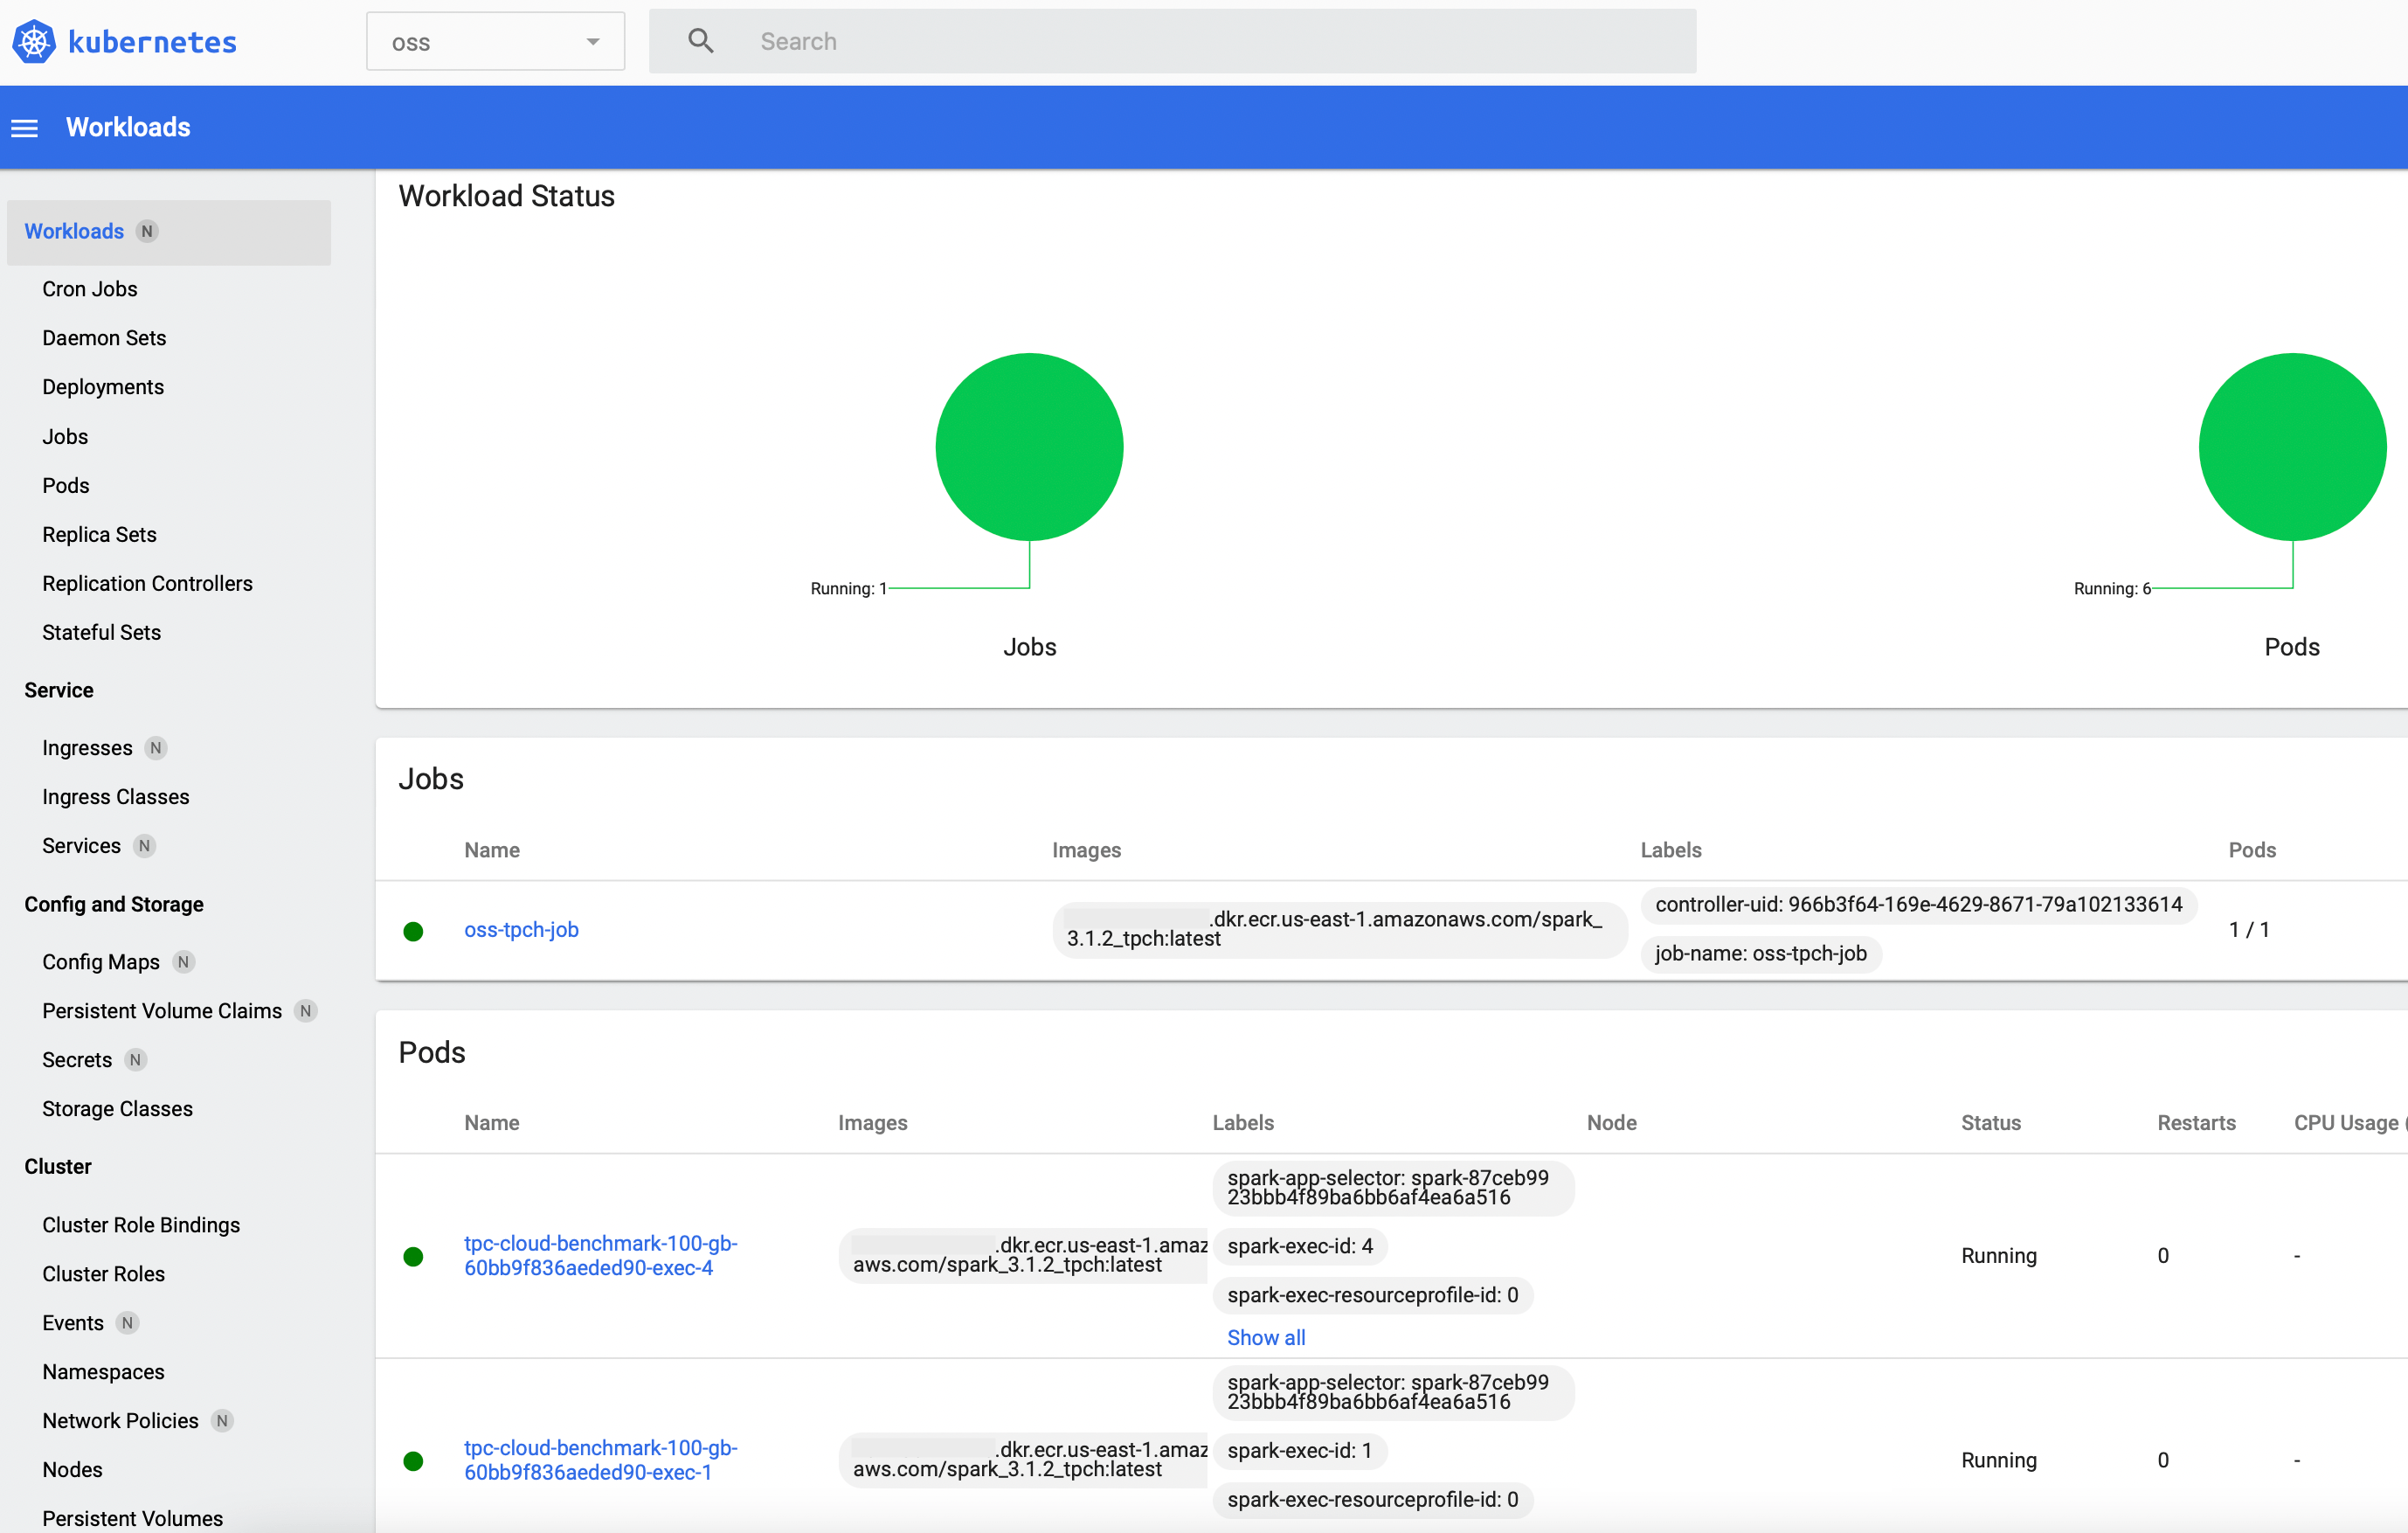
After the last command is entered, a job pod launches almost immediately. Its container invokes the spark-submit process and a Spark driver pod is scheduled. The driver contacts the K8s API server with a request for additional executor pods. After one or two minutes, six pods in total should be up and running in the oss namespace:
The names in the terminal output above indicate that four executor pods were launched which corresponds to the <span class="monospace">spark.executor.instances=4</span> setting in the Job spec as one Spark executor runs in one container/pod.
The Spark web interface can be accessed after forwarding the local port 4040 to the same port on the driver pod:
The UI can now be viewed at http://localhost:4040/:

For our demo run, a TPC-H scale factor of 100 was used, so the executors need to process 100 GB of input data. This takes around 20 minutes:
After the Spark application has succeeded, the Job object and the driver pod linger on in a completed state. Therefore, the driver log can still be inspected from the command-line:
During the final stage, the application writes a JSON file to S3 that contains execution information like query run times. The Job object needs to be deleted before the application can be rerun:
5. Using EMR on EKS
Before an EMR job can be submitted to a Kubernetes cluster, a few objects and relationships that facilitate the interplay between the EKS and EMR services need to be created. The next section walks through the necessary setup steps, the last part describes how an EMR workload can be deployed.
5.1 Setting up a virtual cluster
The first step in preparing the existing cluster for EMR on EKS consists in creating a new IAM role that will be used with the virtual cluster:
The policy that was created at the beginning of 3.4 can be used by more than one IAM identity. After eks-test-policy is attached to the new execution role, it will enjoy the same permissions as the role for the service account oss/oss-sa that was used by the first workload:
In 4.2, the Kubernetes Job was deployed under the oss namespace, so another dedicated namespace should be created now. When EMR is registered with it, a virtual cluster is launched.
EMR processes still lack permissions to use the new namespace. This can be rectified with an identity mapping command:
In the penultimate step, a trust relationship between emr-test-role and EMR service accounts is created, so the latter can use the role credentials. It is not necessary to manually set up an EMR managed service account, this is done automatically upon job run submission.
Finally, the virtual EMR cluster is launched:
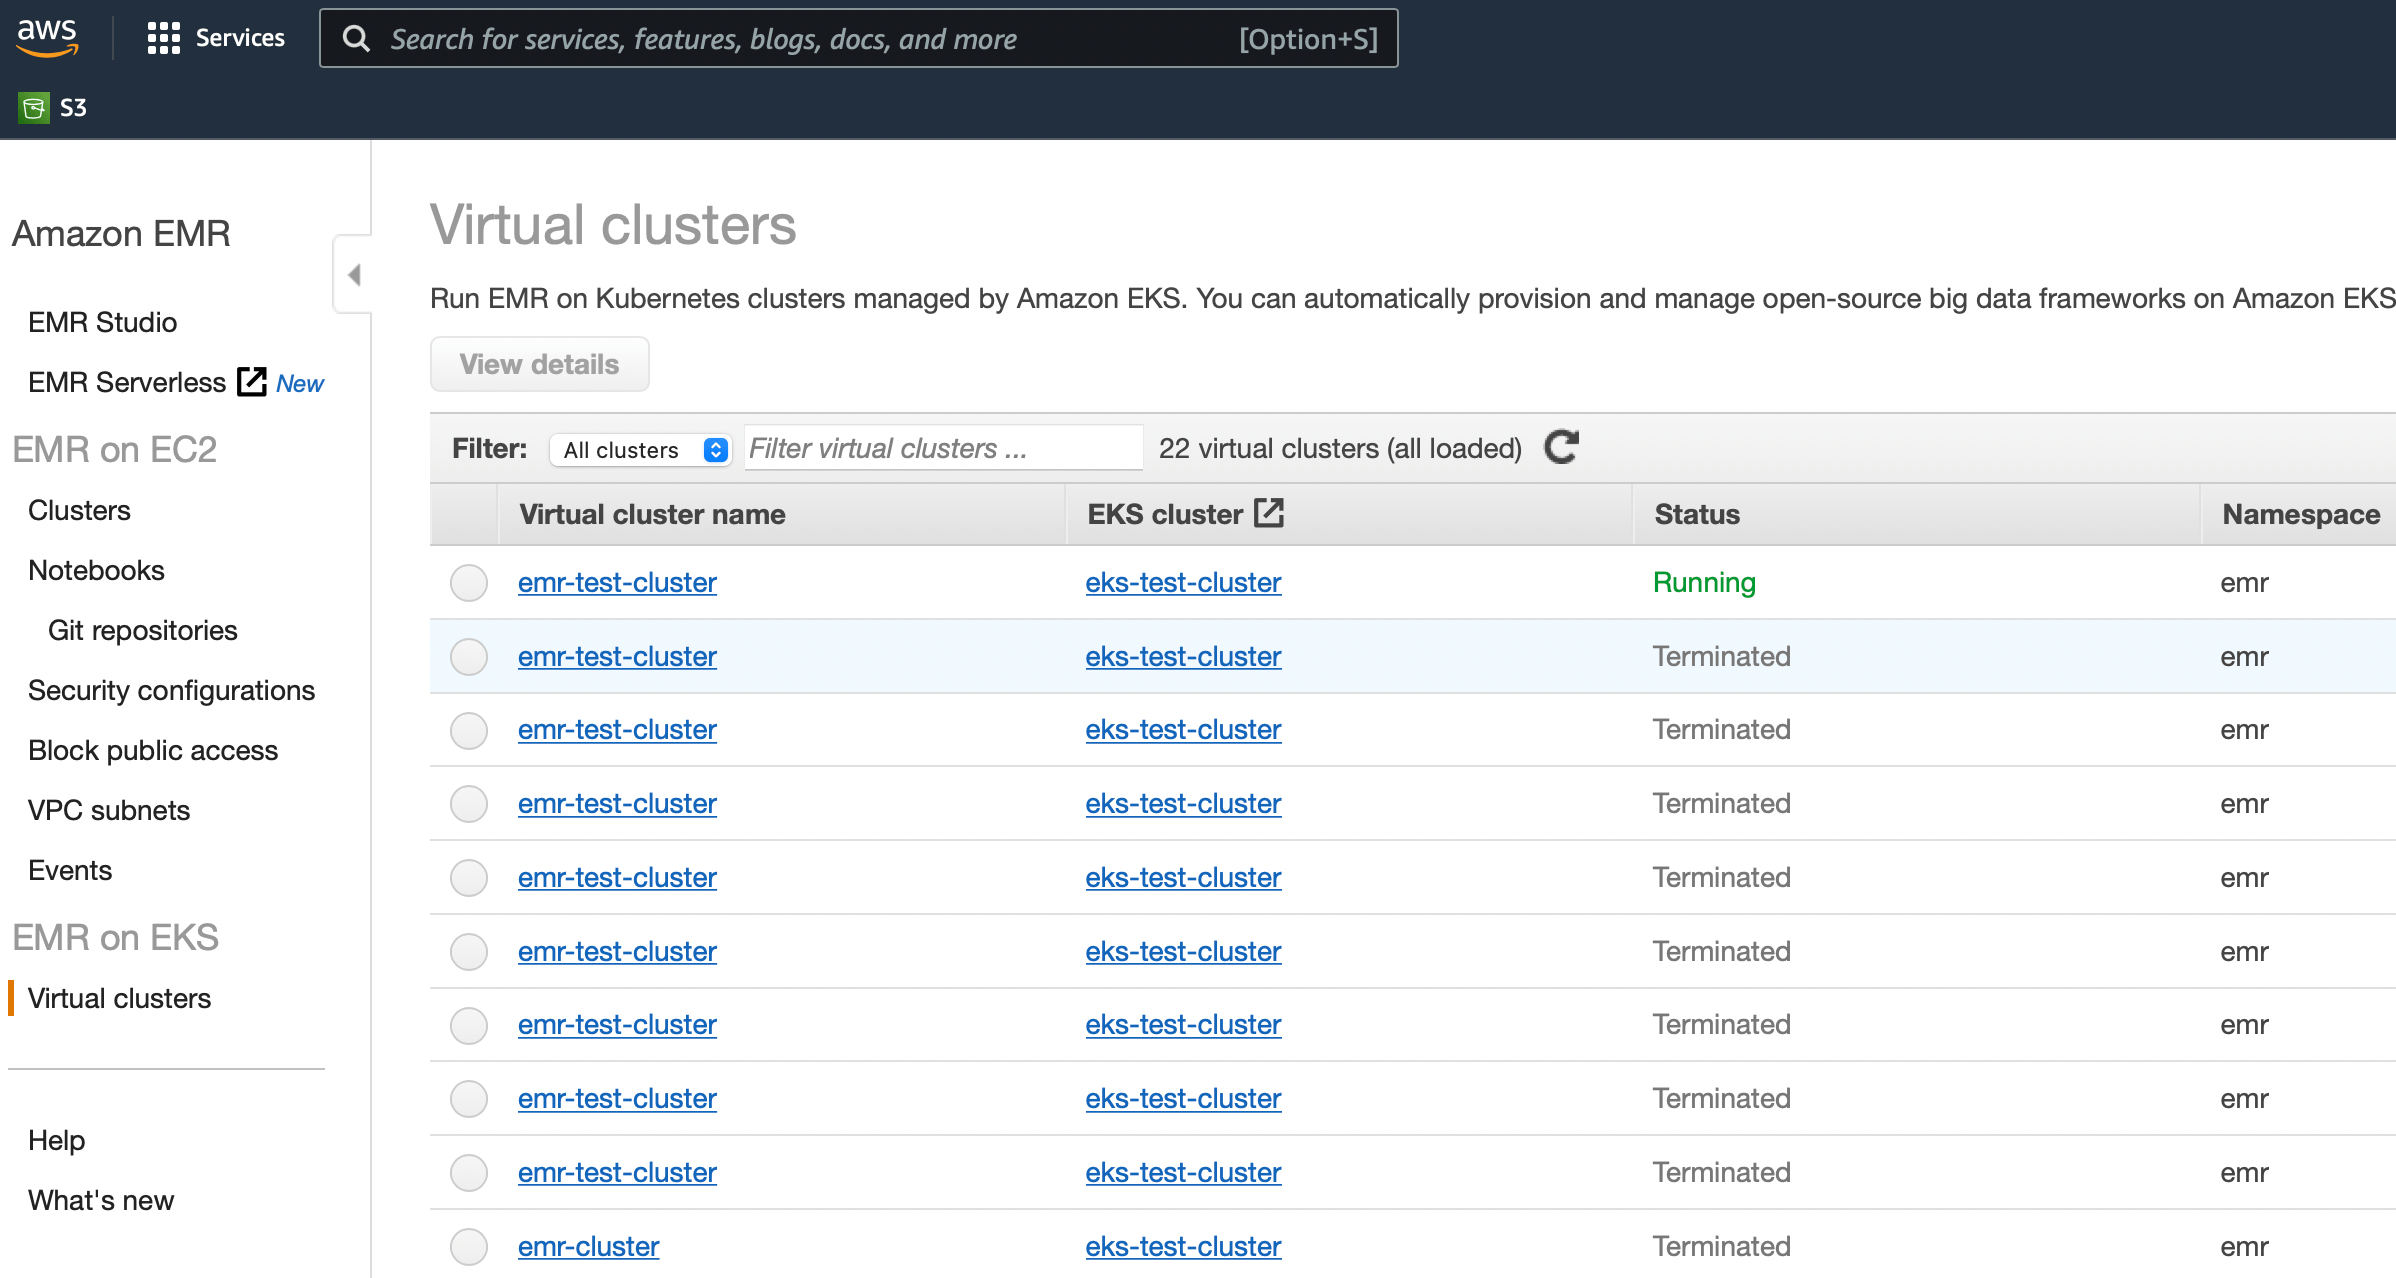
In the EMR console, the Virtual clusters section at the bottom left should now list a new active cluster:
The EMR console does not (yet) provide a lot of functionality when it comes to orchestrating virtual clusters and job runs, most actions need to originate from the command-line. For example, the following command that will be used in the next section retrieves the details of the virtual cluster:
5.2 Scheduling A Job Run
With the EMR on EKS setup described above, it is more convenient to place the pod template contents in files on S3 than to populate and mount a ConfigMap. The two manifests driver_template.yaml and exec_template.yaml contain similar pod configuration data as eks-configmap in the K8s Job specification:
driver_template.yaml
exec_template.yaml
Both template files should be copied to S3:
Our benchmark program can now be submitted to the virtual cluster. The emr-job.json file contains the EMR equivalent to the Kubernetes Job definition from 4.1 . While the latter ultimately relies on open source Spark, the job run initiated below uses EMR release 6.5.0 and the custom image that embeds the EMR runtime:
emr-job.json
An EMR job run can be started as follows:
Similar to the execution of the oss Spark job, six pods in total get scheduled after initiating the job run:
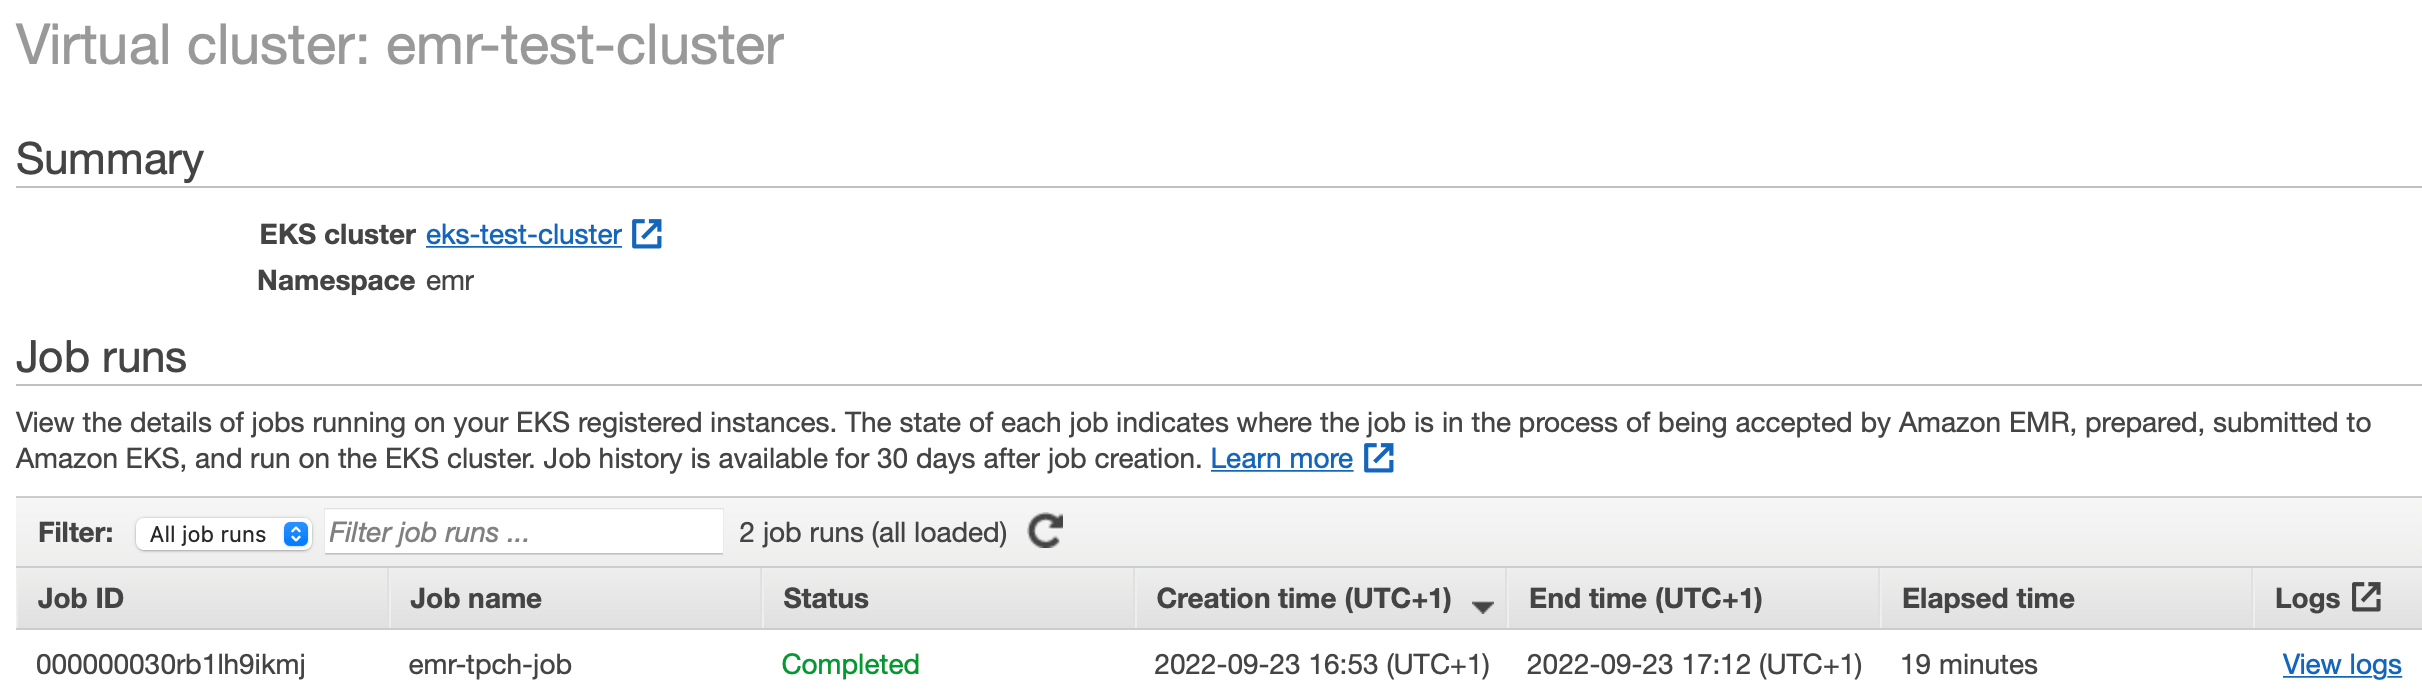
Clicking on the emr-test-cluster link in the EMR console’s Virtual Clusters window opens a job run view. The recently launched job should be listed in a running state:

After the application completes, all associated pods get deleted almost immediately which is a difference to the oss counterpart in 4.2. The final status of the job run is displayed on the EMR console and can be fetched from the command-line:
5.3 Cleaning up
After all applications have completed, the virtual cluster and underlying EKS cluster should be deleted:
For the deletion of a virtual cluster, operations on system resources are not required, so the first command completes almost instantly. The termination of the physical EKS cluster involves the deprovisioning of nodes and the deletion of CloudFormation stacks which can take a few minutes.
Heading 1
Heading 2
Heading 3
Heading 4
Heading 5
Heading 6
Sample text is being used as a placeholder for real text that is normally present. Sample text helps you understand how real text may look on your website. Sample text is being used as a placeholder for real text.
- The rich text element allows you to create and format headings,
- The rich text element allows you to create and format headings,
- The rich text element allows you to create and format headings,
-
Sample text is being used as a placeholder for real text that is normally present. Sample text helps you understand how real text may look on your website. Sample text is being used as a placeholder for real text.


